Maestro offers a compelling solution to streamline your mobile testing efforts and ensure the delivery of high-quality mobile applications via open-source test automation tooling.


In the ever-accelerating world of mobile app development, maintaining quality while rapidly iterating can feel like an impossible balancing act. Manual testing is time-consuming and prone to human error, while traditional automation frameworks are often complex, brittle, and require specialized skills. Enter Maestro, the open-source mobile UI automation framework that "just works".
Just over a year ago, I found myself looking for a new way to automate, here were the requirements:
I've worked with Appium and similar solutions but was unimpressed by their brittle nature, high barrier to entry, and maintenance overhead. I also looked at enterprise solutions and winced at their eye-watering costs.
When I came across Maestro, a relatively new solution, I was excited, it appeared to do everything I needed and claimed to "just work". After a year, here's what I've learned about Maestro.
Maestro is designed from the ground up to simplify and streamline mobile UI testing. And best of all, it really does "just work", at least more times than it doesn't 😉.
During the time I've been using Maestro, it's proven to be a reliable tool, but there are a small number of things to be aware of before diving in.

For whatever reason it doesn't appear to be possible to run Maestro Studio at the same time tests are running. When I do this the driver times out intermittently and the tests fail. This means that when you're debugging your tests, you must remember to kill Maestro Studio before running your tests, and then re-launching Maestro Studio when it's time to do further inspection. I suspect this is some limitation in how the simulator drivers function, I'm not sure. If you do know, please let me know in the comments!
Maestro has done a great job with their cloud offering, like the rest of their tooling, it "just works". The issue I've come across is that it's so popular you're often waiting a long time before the simulator type you want to test on is available. If you're testing on older OS versions then you might be OK, but I'm assuming most people will want to test on at least the latest OS version. As a result, I've implemented my own system that runs my tests nightly, grabs device logs, and screenshots, records a video of the test run, and then outputs everything to a nice HTML webpage for review.
You are also limited to a 7-minute execution time for each test with Maestro Cloud. For most, this won't be a problem and it often makes sense to keep tests small but seems overly restrictive for some use cases.
When I started this journey I envisioned something like the above, however, Maestro doesn't currently support testing on physical iOS devices. This might not be a problem depending on your app and use case given how capable the iOS simulator is but something you should consider before adopting Maestro. The good news is that you can test on physical Android devices (Android is better than iOS anyway 😉).
And that's it. There are some smaller quirks and known issues which you can read here, like how the iOS hideKeyboard command often doesn't work properly, but there is no native command for Maestro to hook into, which is hardly Maestro's fault.
Convinced it's worth a go? If you're ready to experience the magic of Maestro, here's how to get started. You can read the full guide in the documentation.
Run this simple command to download and install the latest version of Maestro.
curl -fsSL "https://get.maestro.mobile.dev" | bashNote: If you're on MacOS you need to make sure you have Command Line Tools installed (Xcode -> Preferences -> Locations -> Command Line Tools).
To run your tests, you'll need to create a virtual device.
To create an Android emulator:
avdmanager create avd --force --name maestro-sim-1 --device "pixel_6a" --abi arm64-v8a --package "system-images;android-34;google_apis_playstore;arm64-v8a"To create an iOS simulator:
xcrun simctl create maestro-sim-1 com.apple.CoreSimulator.SimDeviceType.iPhone-11 com.apple.CoreSimulator.SimRuntime.iOS-17-5Next, you'll need to ensure that the app you want to test has been installed on the iOS simulator or Android emulator.
To install your app on an Android emulator via the CLI:
emulator -avd maestro-sim-1 -no-snapshot -no-boot-anim -wipe-dataadb install /Path/to/Your.apkTo install your app on an iOS simulator via the CLI:
xcrun simctl boot maestro-sim-1xcrun simctl install booted /Path/to/Your.app.yaml file called first-test.yaml with the following content, using your app ID and modifying text to tap to match something tappable in your app:# first-test.yaml
appId: your.app.id
---
- launchApp
- tapOn: "text to tap"With only one simulator/emulator running, execute the following command to run your first test!
maestro test first-test.yamlYou should then get some output that looks something like this:
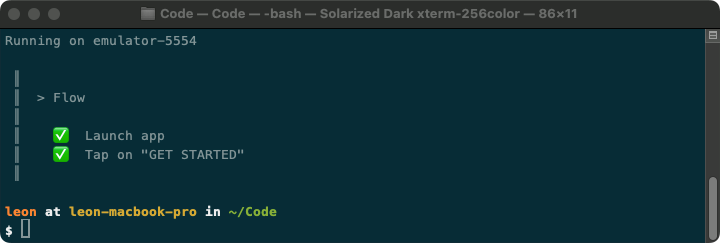
If you run into any issues please review the documentation.

In conclusion, Maestro stands as a testament to the power of simplicity and efficiency in the realm of mobile UI automation. Its intuitive YAML syntax, cross-platform compatibility, built-in resilience, and rapid iteration capabilities significantly reduce the barriers to entry and maintenance overhead associated with traditional automation frameworks. While a few limitations and quirks persist, the active community and ongoing development suggest a bright future for Maestro. Whether you're a seasoned automation engineer or a newcomer to the field, Maestro offers a compelling solution to streamline your mobile testing efforts and ensure the delivery of high-quality mobile applications.